Categories
geography Retrieval

Retrieval practice in geography.

I am always using Twitter or Facebook groups to see what I should be reading, and last week I came across Kate Jones’s twitter feed @87History and her book focusing on retrieval practice.

I am currently focusing on my Year 11 and Year 13 students as they prepare for a series of assessments in order for their final grades to be awarded this year, so felt that it was a good time to be revisiting retrieval practice.

Kate’s book is very easy to read, one of those books that you start and you get half way through without realising it. The book is great for ITTs that have essays to write as Kate uses chapter one to summarise the key elements of research behind retrieval practice. I found this chapter really helpful as the links are there so you can go off and read the research yourself, and it helps to keep your own teaching practice current and research based.

On page 25 there is a wonderful image – below – that Kate has used to summarise the “teaching and learning puzzle” which I shall be using next year when I start mentoring my Geography ITT. It really does highlight the many different aspects there are to being a teacher!

With trying to support my Year 11 and Year 13 classes in revision for their assessments, I wanted to really grab some different ideas for use in the classroom and chapter 2 had a really great idea Kate calls the “retrieval practice placemat.” (p76) Kate has created a generic series of questions for the students to use when retrieval practice is required. Laminated and placed on desks, it is easy to put together but really powerful. Kate has a template on TES you can download for free here

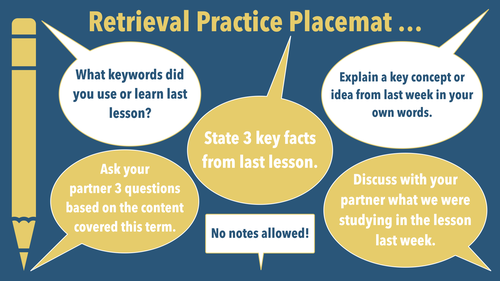
The fact that the statements are generic means that you can use the placement in any lesson, with any year group – so a real workload saver!

I decided to create my own version with the focus on geography. So for example I have included a statement about drawing a labbelled diagram, and retrieval on case studies as well.

The key is not to use the placemat all the time but to vary the retrieval practice diet, so I am planning on using this once a fortnight or so along with other methods.

I decided to use icons as well as text to develop duel coding into the document as well.

One technique that worked really well with my GCSE group was the “Brain dump” idea that Kate discusses on p77. I placed six words on my first PowerPoint slide and gave the students 10 minutes to write as much as they could remember about one of the words.

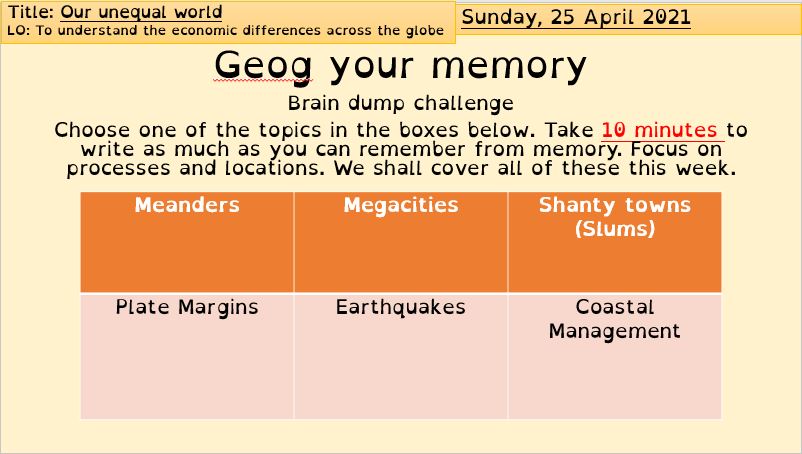
We had six lessons last week, so at the start of every lesson, we turned to the back of the books are wrote for 10 minutes on one of the words. I decided to use spaced practice as well, by using terms from topics that were covered a few weeks, a few months and a year ago. When we have our next lesson, I shall be giving the students a summary from the textbook / revison guide so they can see how much they have remembered, and using a purple pen, add areas that they had forgotten. One student in particular saw this and said straight away – “I can’t remember anything”. A few “are you sure” questions and a few begining letters for the plate margins and 10 minutes later there was 1/2 a page written! It was really pleasing to see the satisfaction and pride in the faces as students realised how much they did remember!

There are lots of other ideas in the book, such as revision clocks, challenge grids and walkabout bingo which I look forward to trying once we can have students moving around the classroom again.

At this time of year, we often ask students to revise for their exams, but perhaps by embeding retriveal practice into lessons through KS3, KS4 and KS5, the need to “revise” for the big exams becomes less about cramming and more of a retrieval habit.

We don’t want the first time that students recall information being their exam!

Categories
geography Remote Learning

Remote Learning Week 4- Mentoring an ITT

Week four of lockdown has now finished. We currently run a four week timetable so I have covered all of my timetable now remotely.

I my a Geography Subject leader in a Secondary school and one of my roles involves the responsibility to mentor geography ITT students. I find this a really rewarding part of my job, but as I was observing and hopefully supporting my current ITT student as she delieved her Year 7 and Year 8 lessons, it got me thinking how odd a year it is for ITT students.

Lets face it, so far they have had to cope with a global pandemic the scale of which has never really been seen before. As a result our whole way of teaching has been transformed this year. I guess you could say that our ITT students are developing some skills that hopefully will need be needed again – unless we have a snow day – which due to global warming is less likely in the South where I teach and of course perhaps now it will be just a remote learning day…

“Snow day – that wonderful moment in the past when you wake up and see a blanket of snow and then wait to hear your school name on the radio / get that email or text message to say the school is shut – bringing joy that you have a day to play in the snow with your children or just chill”

2018 March 1st
Using the remote lesson to your advantage.

The fully remote lesson – what a different way to teach! However as I have watched and listened to my ITT deliver her online lessons it has struck me that yes, it is different and difficult but it can also be really really usefull too.

Research-informed teaching.

The EEF’s Rapid Evidence Assessment of Remote Learning  highlights several key points which we should all take into account:

  1. Teaching quality is more important than how lessons are
    delivered.
  2. Peer interactions can provide motivation and improve learning outcomes.
  3. Supporting pupils to work independently can improve learning outcomes
  4. Different approaches to remote learning suit different types of content and pupils
Teaching quality is more important than how lessons are
delivered.

Point 1 reminds us all that there is more to teaching than the environment or platform that you use. The key to successful teaching remains the same whether in the classroom on online – clear explanations, scaffolding when required and meaningful feedback. The EEF suggest that there is little different between synchronous and asynchronous teaching where these three elements are concerned. If they are clear then it will not matter whether the lesson or part of the lesson is live or recorded.

For the ITT students, the current lockdown provides flexibility in developing their practice – For example, they could pre-record an explanation of a key concept and then listen back and refine until happy with it. This could then be inserted into a live lesson. The key thing to remember – does the explanation build on prior learning – or link in to how the students will be assessed in the future.

As a mentor, I can focus on the discussion and the quality of explanation that the trainee is delivering, when using MS TEAMS. There are no distractions of others talking so I can focus solely on what the trainee is saying. This really highlights the quality instruction that is taking place.

Peer interactions can provide motivation and improve
learning outcomes

One area that I think I need to develop in the online environment is peer interactions. I have started with my Year 13 students as they started to produce a peer revision document via Google slides.

I have noticed that students to listen to the feedback you give other students and then they will often go back and change answers based on the feedback just given. For example, when I have used nearpod and then comment on a piece of work that a student has done, I can see other students editing their answers. When I share a good piece of work, students will be encouraged and through the message chat, ask if I can review their work, and share it with others too.

My next development will be to try and encourage some peer work in groups using google docs – as our students are used to using this in the ICT room.

Supporting pupils to work independently can improve learning outcomes

Currently I am thinking of ways to improve the opportunities for students to work independently online. As most students will be working from home this will generally see students working independently as they perhaps sit in front of their computer/tablet/phone and complete work, so how can we maximise this time?

The research from the EEF suggests that one way would be to encourage students to reflect on their work. One way that I have tried to encourage this is by using Nearpod or FORMS, while colleagues have used google docs – we then comment on the students as they write and offer feedback. We then encourage them to think about how they could improve their work by using questions such as,

“You have mentioned x but do not provide an example. Which example would help make your argument stronger A or B? Think about why that might be the case.”


Another consideration is how students can seek support if they are having difficulties. Perhaps a sheet the students can refer to if having issues with technical issues such as uploading work – or where to get help if needed – Hand up, Group chat, email teacher perhaps? I think colourful icon based help sheets really do help and as students are spending alot of time of the screen at the moment, something that can be printed out / posted home that is short and clear like a checklist will really help.

Different approaches to remote learning suit different types of content and pupils

In this new world of remote learning, there are so many different approaches, all of which have their different strengths and weaknesses. As a teacher we need to consider the best approaches to match our classes and the students learning needs, just as we would when considering different approaches in the classroom.

In geography I use card sort activities and while this works well in the classroom, I have had to adapt the approach for online learning. So I now use Nearpod and the draw it slide. I create a photo of my card sort and then ask students to colour code the cards using the drawing tools – Thanks to Mrs Rush for sharing that approach with me!

Some students like to have a sense of competition and online games like Kahoot can really help to consolidate knowledge – but it needs to be the right knowledge – and other forms of assessment need to also be used to create a snap shoot of the students understanding of the topic. Using Kahoot, or FORMS to generate MCQ are an excellent way to help students retain key ideas and knowledge but don’t forget assessment is more than just quizes…

So when planning online lessons, consider how you might try to develop different activities and assessment opportunities so students have a varied online diet…

Categories
geography Remote Learning

Assessing students via Teams

Week three of lockdown has now finished and I am 50 live lessons in. We currently run a four week timetable so one more week to finish off my full teaching load. So what developments to my practice have I been working on this week? Using MS Forms for student assessments.

Using MS Forms to assess students work.

Over the last week I have been experimenting with the best way to assess students in the online environment, particularly as we have exams coming up that need to be delivered online. I started by using just a simple Word document with the exam question written at the top and shared this with students via Teams as an assignment. However, this method seemed to bring about lots of issues for students doing the work on their phones, or on Ipads.

When I posted a Year 9 exam in Word and asked students to edit the document with their answers, again there were issues – and I think with was part down to my expectation that students are comfortable with editing Word documents – this is not always the case – is it something we teach in school?

So to focus the students on the answers rather than the formating – I moved to Forms. This gives students a directed place to input their answers without the need to worry about formatting which can be a distraction.

Setting up the form – reducing marking load.

My first effort was a simple 6 mark question for my GCSE group. There was space to write and that was about it.

I set up the number of points for the question in the Form and then sent it to the students via the Assignment option – I just clicked on Assignment, from existing and then found the form in my list. I could also post the share link in the meeting chat if needed.

Students have said that they found this easier to fill in on their Ipads and phones, so that is good news.

Feedback time.

Time to feedback and I found this a quick process. I can bring up a student’s answer at a time and then see how long the student has taken to complete the answer. This is helpful – and perhaps might highlight the copy and paste students 🙂

To provide feedback, just click on the points box next to the question and type in the number and then for this question I provided feedback by clicking on the “?” box at the top and then wrote my feedback here. This box is designed for an overall comment of all of the work, and each question itself has a “?” box for feedback on each question if there is more than one. Once done, you just click on the > next to the student name (I have blanked the name out) to move onto the next student.

This is a teacher marked question so I then started to explore auto marked questions as well.

Moving forward – using different types of question

I started to think about using multiple-choice questions to assess students, and clearly, the key here is the quality of the question and the range of answers – too obvious and it makes the question meaningless really.

I then started to think about saving time by providing feedback to the students for each question, so that if they get the auto marked question wrong, they will know why…. This is just a case of clicking on the “question bubble” next to the answer choice and then adding your feedback.

Whole class diagnostics

When a test that has multiple types of questions has been completed you can get a class diagnostic page which is really helpful for future planning. An example is shown below. Clicking on more details gives you a breakdown telling you which students got it right or wrong.

Week four of lockdown coming up, and the second online parents evening. I miss the buzz of the classroom!

Categories
geography Remote Learning

Using nearpod to support assessment

Week 3 of lockdown 3 and I am continuing to develop my TEAMS lessons. Over the last few days I have been developing and exploring the use of nearpod for my remote “live” lessons for KS4 and KS3.

So what have I learnt so far, and where am I going next…

Integrating with Powerpoint.

Most of my lessons are delivered via Powerpoint – I have tried Google slides, but I have been using Powerpoint for so long that I guess I have stuck with it because I am familiar with it.

I started using nearpod as I wanted to increase the number of interactive elements that would support AfL when delivering “live lessons”, and wanted to reduce the number of “shared screens” I had to go through using Teams.

I started with my Powerpoint that I had already created. This one is based on the Progress in Geography KS3 series by Hodder I adapted the Powerpoint that was available on the dynamic learning website (subscription required)

A selection of my slides.

A PDF version of the Powerpoint is available here.

I then uploaded the Powerpoint to nearpod – there are loads of Youtube videos that show you how to do that, so I won’t go into details here. I then started to think about the activities that I would like the students to complete which would allow me to assess their understanding, and also activities that would add an element of interaction for the students.

I started with some starter activities to recall place knowledge – Where different continents are, and also where key UK capital cities and cities are. I used the Draw it tool, and placed a base map of the world, and then posed a suitable question. I did the same for the UK cities.

This would allow me to see whether place knowledge I consider to be “known” by the students actual is or not. If not, then next lesson it would be time to go over these points. I can watch the students work live and then give feedback there and then – really powerful.

My next assessment opportunity is a Collaborate board – a chance for students to virtually stick post it notes on a board – again I wanted to see whether the students could recall the 7 continents of the world.

My next interactive page is a youtube video, but in nearpod, you can also add questions to various points on the video. You can either control the pace of the video or let the students work through the video themself. As a teacher, you can see the comments or answers to MCQs in real-time, which again is useful AfL which I can either address there and then – I normally do using the mic on Teams or next lesson.

After a few of my PowerPoint slides, I then decided to add a virtual field trip – to the glacier we were studying. Easy to do as I just selected Fieldtrip and then searched for the right location. Although not AfL related, it does add that interactive element for students.

I’ll add more elements as I become more familiar with nearpod in the future such as quizzes and matching exercises, but for now below is a preview of my first effort and also a preview of my first video that I have added questions to.

https://share.nearpod.com/nB5yWq0O9cb

https://share.nearpod.com/FtS9bE3F9cb

Does it take a long time?

If you are starting by using a PowerPoint and then adding activities then it does not take too long, as you just add activity slides in between your own. Like everything, the more you add the longer it takes, but also the more useful it will be in the long run.

I shall see how this develops over the week and report back.

Categories
geography Remote Learning

The Rise of the Interactive Teams Lesson!

Week two of remote learning via teams.

Has it only been two weeks! I feel like I have been back about four weeks. Remote learning now feels like the norm and I am getting used to teaching in front of a black screen and lots of colourful circles!

I have tried to focus this week on making lessons a little more dynamic – prompted by a Humanities Twilight session we had on Tuesday where the team shared some really excellent practice.

So how have my Teams lessons changed in the last week…

Using the tools with Teams itself.

I started the week by exploring how I could give feedback to students in real time, as they worked on a written answer. I began to use the Assignment tool in Teams and uploaded a blank Word document for students to write down their class notes and answers to questions. So what have I learnt….

Organisation is the key.

The first couple of times I set assignments I started with a blank Word document and then after adding that to the assignment, I went in and edited the document adding questions. I discovered that by doing it that way round, some of my students did not seem to pick up on the changes I had made, even though the changes were made before I pressed the assign button.

My new method is to set the word document up before and to save to the one drive. I can then find the document in Teams and attached to the assignment with the edits made. This seems to work well and all of the students can see the work as I intend it to look.

What makes this really powerful is the ability to look at the students work while they are typing and providing live feedback orally. I organise myself by having two tabs open in my web browser – one has the TEams meeting running and the other has the Teams Assignment open. That way, I can have my Mic on, and then using the assignment tab to scroll through work and offer feedback. The feedback relates to the student concerned but all can hear. This is useful as all the students will learn from any misconceptions I have highlighted. It is interesting to see how when scrolling through work, students will be editing their answers based on the feedback I have just provided.

This all takes time though, as students get used to working on the new platform. I have seen a greater uptake as the week as progressed as the use of a word document within Teams becomes more routine for students.

Using the rubric

I have also started to experiment with placing a rubric on the assignments, to add with marking. I have started with my A Level group and have used the mark scheme to produce a suitable rubric. benefits are that the students can see what I am looking for, and it also allows me to quickly assess work as well.

Using Forms within Teams

In order to gauge the impact that my teaching is having on the students, and as a form of assessment, I have been setting mini MCQ for the students using Forms. I have found these to be quick and easy to compile and as they are self marked it helps to cut down on teacher workload. I can then spend more time addressing any misconceptions.

I have a depaertmental subscription to Internet Geography and there are some wonderful resources to use here – and their MCQ are brilliant. Not only are they linked to the spec, but they also come in different formats ready to use, MS Teams included. So a few clicks and I have a MQC ready to fly.

The great thing about MS Forms is that you can also get a break down of student performance – so I can spend time focusing on the areas or the students where I need to.

Using Nearpod

I have also started to explore using nearpod to have more interactive sections to my lesson, and I think I will write a piece on this in more detail next time. However, the feedback I am getting from the students is that they enjoy the interactives elements. So far I have tried the draw it, collaborate board, fuieldtrip and poll features with my Yr 11 class and it seemed to go down well. I just uploaded my orginal powerpoint and then added the interactive elements.

A final tip….

For the first week, I have been using youtube vidoes as part of my lesson, puting links in my Powerpoint, and then switching to the tab in my internet browser to share with the kids. I found the constant sharing and unsharing annoying as I then had to scroll through my powerpoint again to get to the right section. I discovered this week however that if I insert the youtube video (or GCSE Pod for that matter) into my Powerpoint then when I present the PowerPoint via Teams the video will play within Powerpoint, so no more switching what I am sharing! Happy days!

Until next time….

Categories
Uncategorized

The Return of the Remote Lesson

National Lockdown 3 or Lockdown3.0 as it has been called started in the beginning of the Spring term for me. We had already planned for an online day on the 4th Jan before the Christmas holidays, so Monday’s set of lessons had already been planned for, however, when the PM stated that we were going to enter a new lockdown and that schools would “be shut” until Feb 1/2 term it meant that my planning had to change.

So my classroom instead of being full of students just contained empty chairs. I decided to come into school as much as possible in the first week, as my timetable was pretty full and we were being asked to host “live” lessons for every lesson we should have on our timetable.

So what have I learnt from that first week?

Lessons learnt from Lockdown 3.0 Week 1

Live Lessons are different!

One of the first lessons learnt is that live lessons are difficult. It is like going back to training college again and learning how to teach again, because the environment you are used to have changed. Normally when I teach there are so many different environmental aspects that you pick up on as a teacher. The engagement level, the looks on the students faces, how well they respond to explanation, the quality of their replies or their written work as you move around the room. Even the weather outside can affect the mood of the class. In a live lesson at my school we have taken the decision to have no cameras or mics on. Mics can be switched on to ask a question. The result is a very different classroom environment to the one I have taught in for the last 21 years!

Pace and feedback difficult to gauge.

The pace of the lesson is difficult to gauge, as you cannot see what the students are doing at the other end of the screen. In a normal classroom setting you get a feel for the pace, and can see the progression taking place, but in the virtual world this is difficult.

Feedback is also different, and can be difficult to give as a class. In the normal classroom environment I can read students work as they are writing and as I move around the class I get a sense of how well the students are doing,

Many students don’t like to speak online.

One interesting observation is that many of my students are not keen to talk using their mics to ask or answer questions but do prefer to type up answers and to ask questions. This is fine, but it does make the lesson very impersonal particularly when you are used to teaching face to face. The face to face teaching and the professional relationships you build up with the classes is what makes teaching enjoyable.

Technology issues are really difficult to overcome for some.

I have had a fair number of students dropping out and then rejoining the Teams live lesson, which must be frustrating for them, and does stop the flow of the lesson at times when a notification comes up to admit them back into the class.

I have also been surprised by the lack of familiarity of Office. We often forget that although students might be living in a digital world and fully immersed in it – they will be so in the platforms of their choosing and so Office / Teams / Google classroom / any other platform might not be as familar to them as we would think.

The main issue seems to be editing an online document via Teams.

Making life easier.

Have a starting screen with a timetable of events or a time scale of what is happening when.

This allows the students to see the overall lesson plan and road map of the lesson, and when writing it, allows you to see if there are any pitfalls.

I have found that as the first week draws to a close I am exploring different features within Teams, and also other websites to make the learning experience richer.

Next week I shall review my progress using Teams once more and share with you some more ideas on how I have made my lessons more interactive.

Until then…

Categories
Geography Club

Developing a virtual geography club

I have been asked to develop a series of tasks that we can offer students across the key stages as a “virtual” geography club.

The reason for going virtual is that when we go back in September, due to Covid-19 changes, we shall be having stagged leave times, so will not be able to hold clubs after school as normal, as we could be teaching a class.

Thining about this, I decided to use google classroom as the platform that will be used to engage and commuicate with the students, as this proved to work work during lockdown.

After designing a few different activities I was in need for some inspriration, which is when I discovered an excellent blog https://educaiti.com/blog/running-a-really-good-geography-club where Caiti outlined her plans for geography club in the coming year. I really liked the plan and the range of activities – the blog is well worth a read.

So with a few more ideas I set about designing the activities – Once I have the whole year planned I shall upload the powerpoint for you to download if you wish. – I was aiming for activities that could be done at home without too much help, but also would require students to think and to complete research. There was also an element of fun to be had, it is geography club after all! When planning, I also felt it important to develop cross curriculum links, particually as we are located within a Humanities Area, so I have also tried to link in some RS and History themes as well.

Here are a few example sheets.

I plan to publish a slide each week using google classroom, and perhaps also use a voiceover as well and publish as a video introducing that weeks challenge.

The icons used for most of the slides are from https://www.flaticon.com/ and excellent free location for icons if you are developing duel coding, or just want to have icons that are a bit different.

Until next time…

Paul

Categories
geography

Deep Dives, Progress and Subject Associations

I have a mock Deep Dive coming up and have been making sure that I have all the documents that I need to hand. One of the really helpful resources that I have used are the progression pages on the Geographical Association website – The Association has also recently produced a summary document for teachers as well – which can be accessed via the link here.

I think this also highlights the importance of subject associations like the Geographical Association and that getting involved in an association whether that be via becoming a member, following on twitter (@The_GA) , attending an annual conference or regularly visiting the websites can really support your day to day classroom pedagogy.

In my opinion, and others may disagree, the power of resources like these and others is in the ideas that they generate, and then the resulting resources that are produced to fit your own school environment. Lots of resources are available on the internet and I think it is important to remember the time and effort that has gone into making the resource fit for purpose – for the school and pupils it has come from – so some editing will be needed to make it useful in your own school setting.

With that in mind, I thought I would share with you my own resources that have been generated from the GA materials, and the materials from the Progress In Geography series that we base our KS3 curriculum on.

Using the GA booklet, and the concept of duel coding, I developed my progression sheet, which will go into students books.

The icons will be used throughout our exercise books and assessments so students are clear what aspect of geography we are assessing. I then used the Progression framework from the Hodder Progress in Geography for each of our units to produce a unit assessment sheet. I still need to change these slightly to make them more student friendly.

As staff we shall be setting assessments to asses the progress against these statements and colour code them to show the level they have achieved. We will then record an overall level for each strand as shown below.

We shall then have an overall chart across the yr to show progress towards the three elements…

I’ll post an example of the assessments once I have put them together.

Categories
geography

A digital media approach to case studies and examples.

As we approach the exam seasion again, I have started to think about how the students access the materials we have at school. In a time when life for most of our students is multi-media and digital, it seems that I am still routed in the paper based society of the 20th century! For some students this focus on paper based materials will be very important, as not everyone has a smart phone, access to the internet or is confident to use online materials. I shall therefore not be replacing my paper based materials totally any time soon, but perhaps now is a good time to think about how I can embrace the 21th century digital age a little more.

Case studies and examples are important in geography, as they provide a contex to the knowledge and skills the students experience.

Images and perhaps videos that are used as case studies or examples are vitial in also developing student’s sense of place, which in turn will promote a much better understanding of the concepts that occur in these places. To this end, embracing a more digital media approach to case studies and examples should help to embed the theory and real life geography together.

Before I go any further, lets cosnider the differences between case studies and examples. From the AQA specification that I use the differences are stated as,

Case studies are broader in context and require greater breadth and depth of knowledge and understanding. Examples are more focused on a specific event or situation, are smaller in scale and do not cover the same degree of content.

AQA GCSE Speficiation

I remember someone once said on a CPD course that case studies were like a buse and examples are like a taxi.

The Bus, like the passengers has much more detail to remember, and like the bus route, will cover several concepts themes or cover a larger area. A taxi on the other hand will focus on one particular area (or destination) and will only include a handfull of details.

Here is my first attempt at producing a digital map of our case studies. You should be able to click on each circle to bring up the details.


https://arcg.is/0uLXrD

My next stage is to develop a story map version that also highlights exam type questions.

Categories
Leadership

Curriculum Intent

I have been asked by my School SMT to put together a document overview for the geography curriculum intent. I had a template to follow, and completing the work took about 15 hours in total, although I still have a few areas to complete. It is currently running at about 7,500 words.

I found the process the most helpful aspect rather than the final document. I found taking the time to think deeply about the curriculum and why I had chosen to include topics and in which order served to remind me why I love teaching geography!

There are so many different links within the curriculum that it could be a never ending document, but the power in the exercise was the thinking that took place. Questions that I considered were:

  1. What topics do we teach, and why are they important to teach to our students.
  2. What order have we placed this topics, and how does this order help to develop skills and knowledge in geography.
  3. How do we ensure that knowledge and skills are revisited across the key stages so they become embedded.
  4. Do we embrace current educational theory when we teach?
  5. Does the geography of our local area influence the geography that we teach? Should it?

By thinking carefully about these questions, I was able to crystallize our department vision, which now reads,

Our Geographical Journey and vison.  

As a department we would like our students to experience a sense of awe and wonder as we explore the geography of the world and UK. As we move through the geographical journey, students will develop knowledge and understanding of the processes and interactions that shape the world and closer to home the UK.  We shall promote diversity through the students’ studies developing cultural awareness and respect of different communities, including our own British values. We shall encourage our students to be active global citizens through their development of an understanding of the importance of sustainability and the future of the world.  Throughout this process we shall be developing and revisiting geographical skills that students can then use in later life.  

In short we would like our students to develop into Geographical Apples  

Awe and wonder  
Processes and interactions 
Personal responsibilities  
Locational knowledge  
Everyday geographical skills  
Sustainability  

The idea of Apples is a play on the name of my school.

Design a site like this with WordPress.com
Get started